I've been putting working on the car off because I didn't want to get all involved on my weekends working on it. I'm anal and I have maintenance ADD, so I'll start fixing shit that didn't really need fixing in the first place, just because.
There was still some light out when I got home so I decided to get a little greasy and try to troubleshoot this damn door latch again.
I feel really bad that I've let the car get so dirty, but seriously the whole lock thing has been a buzzkill. Even if I fix the door opening and closing, I still cannot lock/unlock the door from the outside of the car. I don't have a car alarm currently installed on the car.
It's not going to matter anyway since it's not going to get very far at all if anyone tried to take it lol. I make sure it's in a disabled state, and even then the radiator has a nice hole in it. You'll see in the video the leak just from idling, now imagine how much water it's losing when the water pump is at 5-6000 rpms.
Daaaang
Car ports, where dope ass street cars go to die.
Another thing that I need to fix on the car is the ride height, I just had the car re-aligned the other day at city tire, but the front end of the car has been scraping it's ass off like I've lowered it another half inch or something. But I am pretty sure I've identified the problem, and if I would've caught it sooner I would still have an uncracked passenger fender.
This is my drivable height I like to keep the front at for clearance purposes. And yes it's touching the harness now.
Passenger side has no gap, it lowered itself and the fenders been eating tire, so naturally making a right and not having my zip ties break off, ripped the fender. The rest is just cracked paint... *sigh*
Something looks wrong here, this is the driver door lock. Figured pictures would help.
This guy was just hanging out, I found a spring at the bottom of the door as well, I cannot figure out for the life of me where the hell it belongs.
More angles of the same. Just looking for any and all moving parts.
This is the passenger door, notice anything different? I hope at least that clip penetrating the white cover is still there on the driver side. I don't have a phillips big enough to pull the latch off to rebuild it in the house. May need an impact screwdriver as well.
And well the end of the video will pretty much explain what the fuck happened and why my door wasn't opening. I've successfully tested it and the only thing that needs to be repaired is the functionality of the lock. I could completely be ghetto as fuck and just install an alarm with actuators to unlock the door as a bandaid.
Hella band aid, or I can just fix it. I'll probably never get my alarm from Desmon, I bought it back in 2008 when I bought the car and it's still in a box somewhere along with all of my spare keys. Eventually I'll drive down to the OC and grab that shit from him.
THATS REAL GOOD OEM s14 tail lamps in all their glory. This as dark as they come. They're painted on the inside. Many of you out there know the struggle, zenki owners who want to upgrade to kouki tails, kouki owners who went from black to whack. That the kouki tail lamps fade over time, they're such a timeless and simple upgrade. In my personal opinion they're the 1999 civic type R headlight of the 1996-1998 Nissan 240sx. I could go into a whole segway about the differences in references for newer and older parts we use over here and how things are described. But in short Zenki refers to a first gen design of a car model and Kouki refers to a later model so you have an idea why I am calling them Kouki tail lights rather than 1997-1998 tail lamps. There is nothing JDM about these, they're not an exclusive part, anyone who refers to them as jdm is a fucking idiot. MS PAINT KING!!! Anyway, I mentioned in my previous entry that I was going to get these...
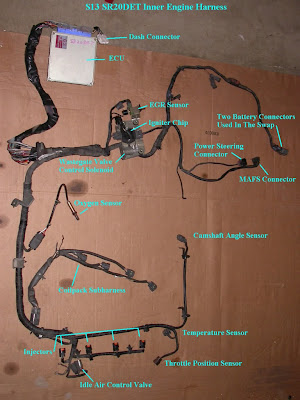
If you've come here then you have decided to undertake the task of wiring up an s13sr20det motor for use in a 1995-1998 240sx. This isn't the end all guide or going to go over problem free for you if it's your first time wiring up an engine. But it will get you set on the right path. - Wayne Tips before you get started on buying stuff. make sure you only use adhesive heat shrink. Just so happens a strand of h/s I bought wasn't adhesive and the solder ended up corroding causing shorts/issues. I had to cut open the whole harness and replace all of the heat shrink to be sure. Extra runs of wiring aren't really necessary to do this, you can use wires from your ka24de harness that are already color matched and the same gauge. The s13sr20det harness can have about 3-4 inches removed from it behind the firewall (in car) but don't make any cuts until you know everything works, then shorten as desired. If you break a plug/connector (use your brain a...
Introduction Hello, So you wanna install one of these. I'll try to be the voice of reason in 2022 and tell you it's probably not even worth it. 10-15 years ago, heck yeah go for it. But if you're insistent like myself, I'll give you all of the tools needed to get the job done. It's been a while since I've installed this. 12 years in fact. I've contemplated making youtube videos but to be honest I am ungodly lazy. This blog post at this point is more of a diary for me as well as a how-to because if I ever have to troubleshoot this crap again I know that I've unnecessarily over-documented this install for the final time. I will say that, I originally followed the write up here: chuonthis s14 dcc write-up I don't want to plagiarize and flat out copy the write up, but I'm going to stage the information very similarly. I have it available in PDF format and have uploaded it here in case their website ever goes down. I recommend saving that....