So your kouki tail lamps are faded? You want to fix them. Well that's good!
THATS REAL GOOD
 |
| OEM s14 tail lamps in all their glory. This as dark as they come. They're painted on the inside. |
Many of you out there know the struggle, zenki owners who want to upgrade to kouki tails, kouki owners who went from black to whack. That the kouki tail lamps fade over time, they're such a timeless and simple upgrade.
In my personal opinion they're the 1999 civic type R headlight of the 1996-1998 Nissan 240sx. I could go into a whole segway about the differences in references for newer and older parts we use over here and how things are described. But in short Zenki refers to a first gen design of a car model and Kouki refers to a later model so you have an idea why I am calling them Kouki tail lights rather than 1997-1998 tail lamps. There is nothing JDM about these, they're not an exclusive part, anyone who refers to them as jdm is a fucking idiot.
Anyway, I mentioned in my previous entry that I was going to get these re-finished. I've seen people use enamel spray, but I don't want the lights to lose their natural shine, or become dull. And I've also seen some people repaint the lenses with a candy red mixed with clear, while also refinishing the black, but they were lazy and painted the nissan emblem as well. So it doesn't look factory, and there is no way to clean that up.

I'd love a throwaway set of these lights to tamper with to see if the lamp design itself can be modified (getting rid of the oem paint behind the lenses). Also another story for another day. I really just enjoy the layout of these tail lights a lot, you won't see an exact aftermarket replica mold of them either because of that nissan logo badge, and the design is trademarked or some bullshit. Instead you see a huge unnecessary indent where the keyhole is, and the badge area is.

I don't know why they didn't just taper out that keyhole like the oem lights. Would've looked 10 million times better, upon further inspection, this is just a shitty and cheap job period. Despite all that and me really wanting to jump on the led tails wagon, there is a lot of things I hate about these lights, main one is if there is any type of rain where you live... these fucking things are doomed, if your car doesn't rest in a temperature controlled environment, these are fucking doomed.

The lights I dropped off on Wednesday of this week have already gone through the first few stages of being re-finished.

Here is the black area's masked off, similar to the article I linked at the beginning of this post as well. There are a few different kinds of painters tape out there. For rounded corners and such I believe you want pinstriping tape, I'm not painting these myself, just elaborating.

Depending on what kind of mix you put in your paint, I think it's called flash, or something and there are different speeds for it, it's mixed in paint to determine how long or fast it will dry. I again am not a painter, I have no idea what Richard is using, I'm just sprouting off shit you may or may not need to know in case you try to tackle this yourself.
The reason for even bringing it up is shortly after these few passes were done, maybe an hour or two, the lamps and the nissan logo were masked off and now the black was applied. No thinner needed here, going full black dynamite.

Once that is dried, he may or may not have not given the areas a quick little color sand. I guess that would depend on variables, or he may have gone right into the clear.

I'm making the images as huge as possible so you can see what they'll look like after the clear is sprayed on them, this obviously isn't the final step. You can spray more clear on them if you want at this point because you'll have to cut and buff them to finish this whole extravaganza.


 |
| MS PAINT KING!!! |
I'd love a throwaway set of these lights to tamper with to see if the lamp design itself can be modified (getting rid of the oem paint behind the lenses). Also another story for another day. I really just enjoy the layout of these tail lights a lot, you won't see an exact aftermarket replica mold of them either because of that nissan logo badge, and the design is trademarked or some bullshit. Instead you see a huge unnecessary indent where the keyhole is, and the badge area is.
I don't know why they didn't just taper out that keyhole like the oem lights. Would've looked 10 million times better, upon further inspection, this is just a shitty and cheap job period. Despite all that and me really wanting to jump on the led tails wagon, there is a lot of things I hate about these lights, main one is if there is any type of rain where you live... these fucking things are doomed, if your car doesn't rest in a temperature controlled environment, these are fucking doomed.
The lights I dropped off on Wednesday of this week have already gone through the first few stages of being re-finished.
 |
| This is the gray the lights will fade into as opposed to that original picture at the beginning of this post. |
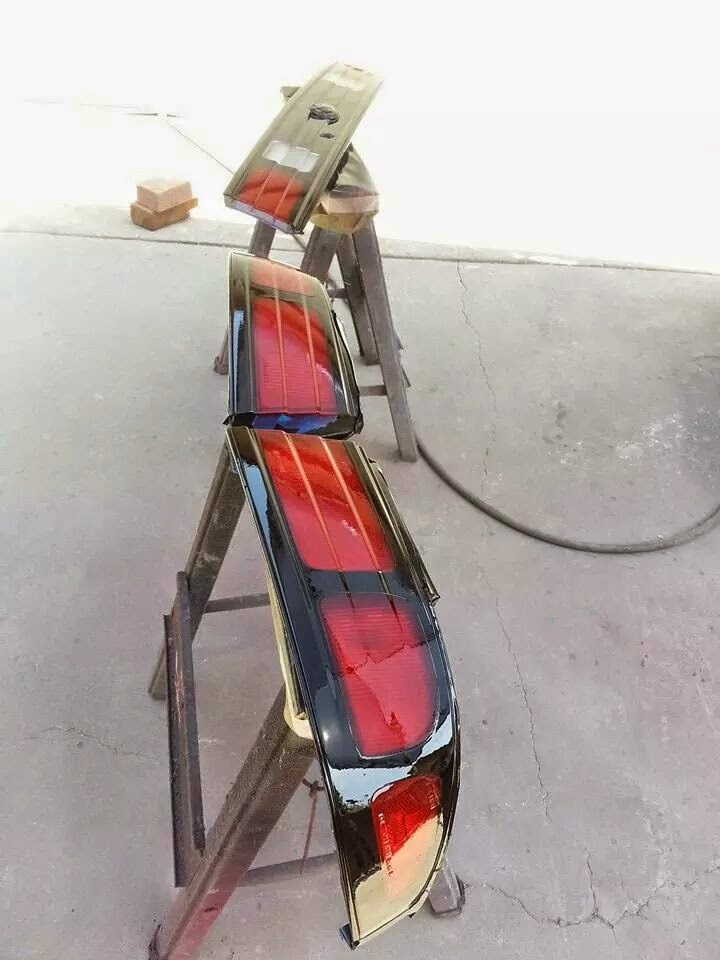
I'm not sure if the one above this block of text is before the picture below or after. I know a few passes of red had to be done over the amber corners. All of this is being painted with a legit spray gun, and I don't know ratios or mixtures. If you know how to paint, you have a basic idea of what Richard is doing to achieve the effect.
The candy red is either diluted with a clear, or thinner. Probably a clear in this case so the red is still see through or crystal like rather than solid. We still want to be able to see the lights through the paint!
 |
| Amber be gone! All red ertang! |
The reason for even bringing it up is shortly after these few passes were done, maybe an hour or two, the lamps and the nissan logo were masked off and now the black was applied. No thinner needed here, going full black dynamite.
Once that is dried, he may or may not have not given the areas a quick little color sand. I guess that would depend on variables, or he may have gone right into the clear.
I'm making the images as huge as possible so you can see what they'll look like after the clear is sprayed on them, this obviously isn't the final step. You can spray more clear on them if you want at this point because you'll have to cut and buff them to finish this whole extravaganza.