RX330 Projectors, Dancing Led Signals, and Blackout Tint
Get link
Facebook
X
Pinterest
Email
Other Apps
-
This is going to be a three part blog of some sort. I had been traveling to the 240 tuesday meets which are about 60 miles away from me and I head home to a lot of freeway and road construction so I can't see a damn thing. Normally I've never had any issues with my halogen projectors on the kouki headlights. But I've always been curious about doing an HID swap.
After seeing Hugo's s14 with dancing leds on his Zenki I was curious about getting some done for my car. I've always wanted some kind of led lights, but clearcorners.com lights were just never in my budget even though Mike Mamos is an acquaintance. I don't ask for discounts at friends businesses, I spend money elsewhere like a true piece of shit. HAHA
Hugo's S14
I really like the look of the blacked out headlights mainly because the led corners and turn signals are built in a manner where there is like a piece of tape that's put over the area where the oem light would sit and holes are poked in it for the leds to sit on top of. It doesn't look horrible but aesthetically it doesn't match the oem headlight at all.
I'm really weird about symmetry and flow, blah blah blah. Even the black of the stickers not matching the black of the headlights if you were to paint the trim would be enough to set my OCD on fire. The blackout tint is reversible vs painting. So there's that!
Lets begin with the parts list and how much I am invested in this.
The dancing lights were roughly 700 dollars
All in all I don't think this was too expensive of a project. Minus the tools I ended up buying (needed)
HID Bulb D2H 4300K Pair Diode Dynamics was $65.65 on ebay 35W / 55W DC Digital Slim HID Replacement Ballast Conversion Kit Universal $15.76 2x OEM 04-09 Lexus RX 330 / 350 Xenon Headlight HID D2S Lightbulb Projector Set $87.59 S14 Jdm Black Crystal Headlights 97-98$214.61 9005 9006 H1/H7/H11 Relay Wiring Harness HID Headlight DRL Conversion Adapter$13.13 LS20 Lense : Black Series from the retrofit source $65.93
grand total of $462.02... honestly the clear headlight covers are what cost the most out of all the things I bought. The clear lenses are recommended to increase your light output.
This is the expected result of the work. Which looks leaps and bounds better than what I can see currently at night.
The Teardown
First you want to start off by removing all of the clips on the headlight holding the glass to the housing, they're relatively easy to get off, put them in a little baggie for later.
Once you have those off, remove your bulbs from your headlights and preheat your oven to about 200 degrees, you want to put the lights in there on the bottom rack for about 10 minutes, start to work the glass off of the lights once you pull them out of the oven. If needed put them back in for about 5 minutes or so.
Once you get your glass off, you'll need a phillips screwdriver to remove the light shields/dressing. It's about 4 screws in total, be careful removing the projector shield as it has two plastic pegs up top pressed into the light.
Once you get all of that loose counter-clockwise hit the 3 adjustment screws on the back of the lamp to release the projector housings.
Pretty straight forward, I just so happened to have a 5/16ths magnetic bit in my milwaukee bit set that fits perfectly for this. Once you have the oem projector housings out you pretty much will be looking at this. There is about 4 phillips screws on the back to remove the shield for your high beam. It's recommended to pull them off so you don't damage them.
Everything disassembled.
Here is everything removed, and a quick video just reiterating that.
Here is the oem projector lense on the left and the clear lenses on the right. Something this small can drastically increase your light output and I'm all for it. Same with switching to plastic headlight covers from the oem glass which is designed for the halogen projectors.
Another recommendation but not 100 percent necessary to increase light output is to take the cutoff shield out of this housing which you can access from the back and it's just two phillips screws to get it out. Just open up the holes a tad. I used a sharpie to indicate how little is needed to remove.
that's it, drop them back in and they should sit a hair lower than they originally did. You can kind of see a ring in the lower left hand corner here. It's a cutout from a cereal box, I was making an o-ring gasket to sit on top of the oem gasket that sits under the lense (not pictured) But in the projector picture above you can see where the lense normally would sit. But I found the oem gasket to be too small for the new lenses I bought so they were jiggling a bit. I just stacked the cereal box cutout on top of the oem gasket for the lense to fit in the projector housing a bit more snug. Again OCD is a bitch.
I guess this is where things get a bit confusing, I originally had the projectors on the side of the headlights with matching letters. So R for Right and L for Left, but in the build of these I saw the projectors were on the opposite sides. So I'm guessing the rising cutoff goes on the outside and not the inside which makes sense. There's a huge possibility I have them mounted backwards, if anything it's a pretty annoying mistake to deal with. But I guess We'll cross that bridge when we get there.
Painted the projector dressing (there is a small shield on the inside of the projector housing which I removed and did not paint, later re-inserted)
And drilled out the back of the light covers to slide our grommets through, funny enough I bought a 100 dollar step bit because I'm a Milwaukee slut only to have over drilled the hole size on both caps. Not that I am worried about weather sealing the lights, I had cut the backs of them open a long time ago to fit my mid mount intercooler. But I digress!
Moving along, sticking my ebay lights in the oven at 200 for 15 minutes to get the covers off and sticking the finished lights in there to re-heat the glue. And I put the covers back on, and when they cooled off I added some extra clear silicone to the backs just in case I missed any gaps. My new Junyan corners and signals also needed to be sealed so I did that and let them sit a few days before trying to tine them.
My signals I sent off to paint because I could not for the life of me wrap the tumor of the signals lol.
I posted my results on Zilvia and someone recommended I get different ballasts instead of the paper thin ones I purchased. But I have yet to find any good recommendations on what to use. Hopefully I get that sorted before I begin wiring this stuff up. And I'll be re-doing the tint on the headlights as well.
Took the lights apart freaking out thinking I put the projectors on the wrong sides, swapped them anyway and both shields cut up to the right. For some reason I thought they looked like this -_(l) _-(r) but it's more like /-(l) _-(r) I guess I won't know if I got two left hand projectors until I hook everything up. I didn't really see where I could buy replacement cutoff shields and really I don't feel like opening the headlights again. Just at a "it is what it is" point with this project.
I'll post a part 2 with the electrical portion of installing my lights. And what I plan to do to sort out the ballast situation/suggestion
THATS REAL GOOD OEM s14 tail lamps in all their glory. This as dark as they come. They're painted on the inside. Many of you out there know the struggle, zenki owners who want to upgrade to kouki tails, kouki owners who went from black to whack. That the kouki tail lamps fade over time, they're such a timeless and simple upgrade. In my personal opinion they're the 1999 civic type R headlight of the 1996-1998 Nissan 240sx. I could go into a whole segway about the differences in references for newer and older parts we use over here and how things are described. But in short Zenki refers to a first gen design of a car model and Kouki refers to a later model so you have an idea why I am calling them Kouki tail lights rather than 1997-1998 tail lamps. There is nothing JDM about these, they're not an exclusive part, anyone who refers to them as jdm is a fucking idiot. MS PAINT KING!!! Anyway, I mentioned in my previous entry that I was going to get these...
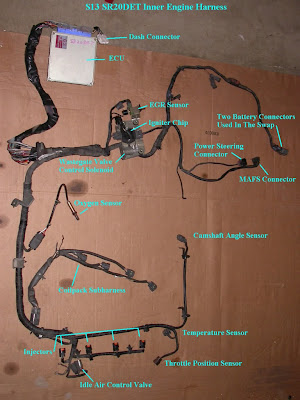
If you've come here then you have decided to undertake the task of wiring up an s13sr20det motor for use in a 1995-1998 240sx. This isn't the end all guide or going to go over problem free for you if it's your first time wiring up an engine. But it will get you set on the right path. - Wayne Tips before you get started on buying stuff. make sure you only use adhesive heat shrink. Just so happens a strand of h/s I bought wasn't adhesive and the solder ended up corroding causing shorts/issues. I had to cut open the whole harness and replace all of the heat shrink to be sure. Extra runs of wiring aren't really necessary to do this, you can use wires from your ka24de harness that are already color matched and the same gauge. The s13sr20det harness can have about 3-4 inches removed from it behind the firewall (in car) but don't make any cuts until you know everything works, then shorten as desired. If you break a plug/connector (use your brain a...
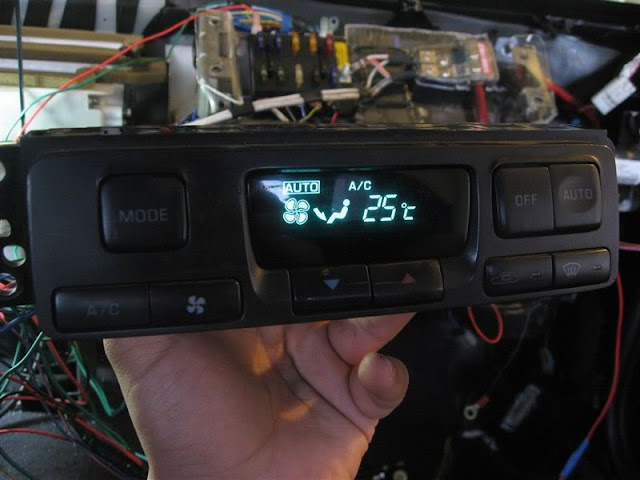
Introduction Hello, So you wanna install one of these. I'll try to be the voice of reason in 2022 and tell you it's probably not even worth it. 10-15 years ago, heck yeah go for it. But if you're insistent like myself, I'll give you all of the tools needed to get the job done. It's been a while since I've installed this. 12 years in fact. I've contemplated making youtube videos but to be honest I am ungodly lazy. This blog post at this point is more of a diary for me as well as a how-to because if I ever have to troubleshoot this crap again I know that I've unnecessarily over-documented this install for the final time. I will say that, I originally followed the write up here: chuonthis s14 dcc write-up I don't want to plagiarize and flat out copy the write up, but I'm going to stage the information very similarly. I have it available in PDF format and have uploaded it here in case their website ever goes down. I recommend saving that....